Showing posts with label tiles. Show all posts

12 December 2024

Polymer clay UV light fastness trial - after 3 years

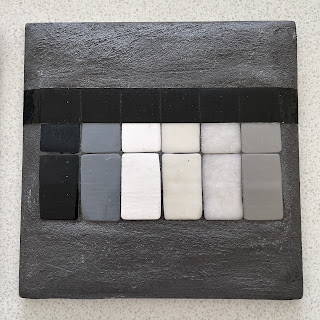
I started this trial on 12 December 2021. Six months on, I looked at the tiles after cleaning off all the sticky residue from the black masking tape (top row in photo). There was slight yellowing of the exposed area on the white and purple tiles but this is not easy to see in the photo. The neutral tiles showed no noticeable change to the colours but the varnish has attracted a lot of dust/dirt, so I would definitely not use varnish on items intended for outdoors.


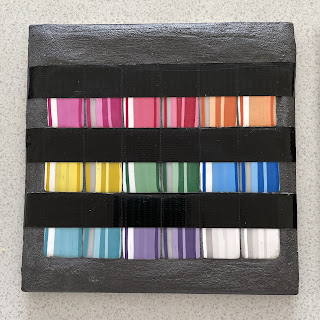
The bottom row of the photo shows the tiles after three years. The heat of the sun on the black masking tape had almost welded it in place. I decided it wasn't worth the time it would take to try and remove the tape and clean off the sticky residue. It was quite clear that all the colours had faded and the white, pearl and translucent colours had discoloured considerably. The white had yellowed (not so easy to see in the photo) but the pearl and translucent had almost gone brown.

Sadly, this experiment has confirmed that polymer clay is not suitable, in terms of light fastness, for long term use outside.

12 June 2022

Polymer clay UV light fastness trial - after 6 months

I started this trial on 12 December 2021. Six months on, I looked at the tiles after cleaning off all the sticky residue from the black masking tape. There was slight yellowing of the exposed area on the white and purple tiles but this is not easy to see in the photo. The neutral tiles showed no noticable change to the colours but the varnish has attracted a lot of dust/dirt, so I would definitely not use varnish on items intended for outdooors.

Trial after 6 months


12 March 2022

Polymer clay UV light fastness trial - after 3 months

I started this trial on 12 December 2021. Three months on, I looked at the tiles. There was no change to the coloured tiles. On the neutral tiles, the varnish has attracted dust but there was no change to colours.


Neutral tiles after 3 months


12 January 2022

Polymer clay UV light fastness trial - after 1 month

I started this trial on 12 December 2021. One month on, I looked at the tiles. I did not photograph them because I could not be bothered to clean all the stickness off the surface of the tiles that came from the black tape but it was quite clear that there was no change to the colour of any of the tiles. 

12 December 2021

Polymer clay UV light fastness trial

For some time I have felt it is a shame that I cannot sell my polymer clay mosaics/creations for outdoor use, as the colours will fade if exposed long term to sunlight. How much and how quickly this will happen, I do not know, so I have decided to set up a trial. I wanted to get this going now, as we are just entering the summer months (in New Zealand) and our sunlight is extremely harsh, so it will be a good test.

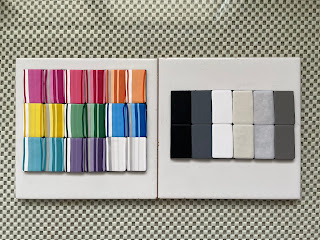
I am currently using the New Zealand made brand of polymer clay, called Du-Kit, as it has been hard to get Sculpey Premo (my prefered brand) since the Covid Lockdowns. To save mixing colours, I am using the ends of some canes that were made for a project, which have a range of colour blends within a particular hue (shown to the left in the photo below). I have also included some neutral colours (shown to the right in the photo below): black, grey made from 50% black and 50% white, white, pearl, transluscent and Super Sculpey (grey). 


The polymer clay tiles have been stuck and grouted to the back of a couple of ceramic wall tiles, as this was all that I readily had to hand. 


The top half of the coloured tiles have been masked off with opaque black plastic tape. I am hoping this will hold up to the long term effects of the weather.


There are two rows of tiles in the neutral colours. The top half of the top row has been masked off with opaque black plastic tape. The bottom row has been used to test UV protective varnish; the upper half of the bottom row has 2 layers of Josefine Very Matt Varnish and the bottom half has 2 layers of Josefine Satin Varnish.


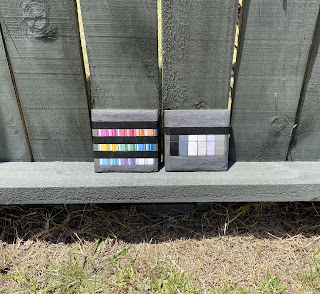
Today (12th December 2021) I have placed the trial tiles on the bottom rail of the garden fence that gets plenty of sunshine during the day.

I plan to check how much colour fading has occurred after 1 month, 3 months, 6 months and 12 months. Then, depending on the results, I may continue to monitor.

31 July 2012

Polymer clay artwork sold on opening day

I attended the opening night of the Great Art Sale at the Lake House, Takapuna and was thrilled to discover that my polymer clay tile artwork "Our Future" had been sold earlier in the day.

The exhibition runs until 19 August.

01 November 2011

Planning for 2012

Following on from my last post, the discovery that my trial 'beachwear accessories' became too soft when exposed to intense sunshine, has led me to rethink my way forward for the next few months. I have decided to halt the launch of the beachwear accessories, which I was intending to promote over the summer months, until I have done some more trials with different thinknesses of polymer clay in the hottest months.

Instead, I will concentrate on preparing material for teaching workshops, with the view of having these up and running for February/March 2012. Due to the Christmas/January holiday period, I will start promoting the workshops at the next Mission Bay Art & Craft Market on Auckland Anniversary Day (30 January 2012) with a concentrated effort during February.

To begin with I will do half day 'Polymer Clay Mosaics' workshops, using my own custom made mosaic tiles, while I accumulate enough equipment. Then I will also be able to offer a full day 'Introduction to Polymer Clay' workshop, which will cover all the basic aspects of working with polymer clay, plus an insight into the many techniques and uses; hopefully inspiring further interest in this wonderful, versatile creative medium.

23 August 2011

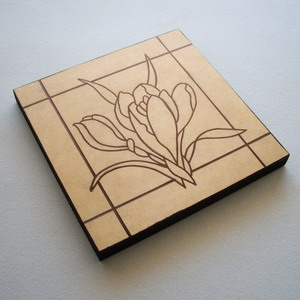
Crocus mosaic complete - with step by step photos

Here is the completed Crocus mosaic - it measures 8" x 8" (20cm x 20cm)


It started life as this...


And here are the stages inbetween...


1 - This is my sketch design of how the finished mosaic artwork should look.

2 - The Pro-Panel block board, that will form the base of the mosaic artwork, is sealed with two coats of diluted Weldbond glue.
3 - The outline design is transferred onto the board, using carbon paper, and then the edges and the back are given several coats of black acrylic paint.
4 - Custom colour blends are created, from the blocks of polymer clay, for the different elements of the design. I roll out thin sheets (2mm thick) of the different colours, using a pasta machine to ensure they are an even thickness. The sheets are then baked to harden the clay.
5 - Each piece of the design is cut from the baked coloured sheets of polymer clay. The edges are sanded smooth and the back is roughened with coarse grade sandpaper, to help create a ‘key’ for gluing.
6 - All the pieces are glued in place, using Weldbond glue, and left to dry for at least 24 hours. Minor trimming of some edges may be necessary to ensure neat, even joint lines.
7 - Acrylic paint is used to colour the tile grout, which is spread over the artwork, pressing it into the joints. The excess grout is wiped off with a damp sponge before it begins to cure. This process may need to be repeated to ensure all the joints are evenly filled.
8 - After the grout has dried for at least 24 hours, the tile surface is lightly sanded (with grades 400 through to 1000) to remove any remaining grout residue. It is then hand buffed to give a soft sheen.

26 July 2011

Close-up of my panel in the 'Light of my Life' collaborative project

NZ Art Guild Annual Members Exhibition 2011


This evening was the opening night of the New Zealand Art Guild's Annual Members Exhibition. I have two polymer clay mosaic artworks in this exhibition, as well as having done one of the 56 panels in the collaborative project 'Light of my Life'. 


'Light of my Life'

My panel is on the bottom row, second in from the right (see next post for a close-up picture). This large artwork will be auctioned on TradeMe and all the proceeds will go to the charity KidsCan, supporting disadvantaged Kiwi kids.

20 July 2011

Featured on Sandy's Creations in Clay blog

Today I have been featured on Sandy's blog

http://sandyscreationsinclay.blogspot.com/2011/07/mosaic-tile-masterpiece.html

It is the first time (to my knowledge), I have been featured on another polymer clay artist's blog, so I feel very honoured.

18 July 2011

Our Future – mosaic artwork is now complete

Here is the finished piece.


“Our Future” by Claire Fairweather
30.5cm x 30.5cm, polymer clay tiles on canvas
Designed for the NZ Art Guild Annual Members Exhibition 2011

This mosaic tile artwork has been designed to show the different phases of love during the course of a lifelong relationship – the future for a couple in love

Key to the meaning behind each tile – start at the bottom left hand corner and work round in a clockwise spiral to the centre

5
6
7
8
9
4
19
20
21
10
3
18
25
22
11
2
17
24
23
12
1
16
15
14
13

1
The heart is a universal symbol of love, which is something most people want to experience during their life-time
2
The script style writing reminds me of old fashioned hand-written diaries, where young women often write about their thoughts and feelings for the future
3
The butterflies represent that feeling you get when you first fall in love, along with the dreams, hopes and wishes of how you would like the future to be
4
Is Cupid really responsible for the initial attraction to that special person in your life?
5
Flowers are often given as a gift of love
6
Romance – the word can be written with a flourish and it certainly brings happiness and excitement to everyday life
7
Your heart seems to be bursting with joy when you are in love
8
The blooming rose symbolises a growing relationship
9
The lace texture is evocative of lingerie, worn when a relationship becomes more intimate
10
Passion – this phase in a relationship can be very intense
11
The lips symbolise a kiss, which is often given with great passion
12
The tying of two ribbon ends into a bow, symbolises the joining of two beings as one
13
This tile bears my signature seal, which is incorporated into a pattern of hearts, hugs and kisses
14
Love – the word is impressed into the tile with strength like the emotion it conveys
15
An engagement ring symbolises the beginning of a lifelong committed relationship
16
Commitment – as defined in a marital relationship
17
Wedding bells ring out the joy of marriage
18
The linked hands represent the joining together of two people in holy matrimony
19
A loving background forms the basis of a stable, long-term relationship
20
Shelter and protection are symbolised by the house
21
The different layers within the heart reflect the different types of love
22
The tiny hand and foot prints represent a new arrival
23
Having children makes a family
24
Caring for your partner and family never ceases
25
Into grey, old-age two hearts should still be entwined as one


24 June 2011

Sketch for 'Our Future' mosaic artwork


This is a rough sketch for my other artwork for the NZ Art Guild's Annual Members Exhibition. It will be made up of twenty-five large 'mosaic' tiles, each measuring 21/4" x 21/4" (5.7cm x 5.7cm). Starting in the bottom left hand corner and following round in a clockwise spiral, it has been designed to show the different phases of love during the course of a life-long relationship - the future for a couple in love.

I am now setting about creating each tile. When the piece is complete I will post a photo, along with a key to explain what each tile represents or the meaning behind it.


09 April 2011

Completed piece for NZ Art Guild Collaborative Project 2011

Selected portion of my contribution
to the 2011 colaborative project
- Light of my Life
I have completed my part of this collaborative project and posted it off today. Made of large polymer clay 'mosaic' tiles, this is a small portion of it, when it was in progress. I cannot reveal the whole piece until it has been unveiled at the Annual Members Exhibition - Our Future, in July.

28 March 2011

I have been busy...

I have not posted for a while but I have been busy. This month, I have been making my own polymer clay mosaic tiles and carrying out a learning exercise. I have used small 4" (10 cm) square canvases as a base for creating a series of small mosaic pieces based on the Pohutukawa flower. There will be six in total, when I have completed this exercise, using different styles of mosaic. I will post some photos when they are all complete.

I am doing this to decide which style of mosaic work to use before I attempt a larger size of mosaic artwork. I have a couple of 12" (30 cm) square canvases that I am intending to work on next - but I am still undecided as to whether to work on board or canvas. The canvas is good because it is all ready made and can be hung straight on the wall, but I am not sure as the size gets larger, if the canvas will start to sag with the weight of the tiles - I will find out when I start one of these larger pieces.

I am also experimenting with different acylic mixtures to grout the tiles as I fear that if I use normal tile grout, it might eat away at the canvas (?). If I stick the tiles on to a wood or MDF base, then I could just use ordinary tile grout. I need to make a decision about which type of base to use soon, before I start to spend time creating larger pieces of artwork.

21 March 2011

NZ Art Guild 2011 Collaborative Project – Light of My Life

Last week I received all the instructions and my piece of board for taking part in this project. I am looking for inspiration on the theme ‘Light of My Life’ and still thinking about how my little piece will take shape. One thing that I have decided is that I will make my design out of polymer clay mosaic tiles and stick these to my piece of board. I do not expect any one else will be using polymer clay, so it will stand out as being different – I just want it to look really good, as this is an opportunity for polymer clay to get some publicity and, hopefully, some good press.  

02 March 2010

Trial ‘mosaic-style’ brooch


I started making a trial ‘mosaic-style’ brooch, by pressing some of the baked tiles into a base of unbaked polymer clay. They did not press in as far as I thought they would, as the base clay was quite firm. Perhaps I should try making the mosaic tiles thinner, so they do not stick out as much, if I want to put a final coat of MagicGlos on them.

This is just the face of the brooch. When I come to do the back, I want to try concealing the brooch pin bar, under the backing layer of pc - I have seen some examples on the internet and it looks so neat. There will be no worry about the brooch pin coming unstuck, using this method. I guess it is not as easy as it looks but will give it a try. I need to order some stronger brooch pins for this.

I am also debating about whether to sign my brooches on the back by inscribing my signature in the clay or whether to have a stamp made with my insignia (I could use the artwork I prepared many years ago, for my mirror designs, which has my initials CF in a round cornered rectangle).